News


Rainwater Harvesting for Irrigation — System Design & ROI Guide
04 Sept 2026Can Rainwater Harvesting Cut Your Irrigation Bill by 58%?
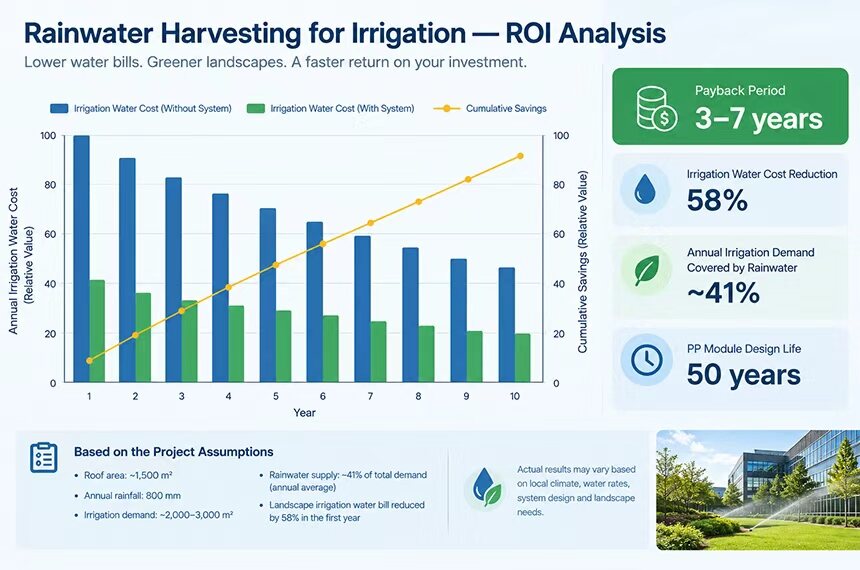
Imagine it is the middle of July. The grass around your building is still deep green — yet the water bill has dropped 58% compared with the same month last year. That is not magic; it is a carefully designed rainwater harvesting system. This guide shows how five core components turn rainfall into a 'free' irrigation source, and why the investment typically pays for itself in 3–7 years.
For commercial property managers, landscape water typically accounts for 30–40% of total utility spend — and in water-stressed regions such as the Middle East, North Africa, the American Southwest, and northern China, that share climbs even higher as municipal rates outpace inflation. Buildings that install rainwater systems report 20–50% reductions in total water consumption. Markets are responding: the Middle East and Africa region saw rainwater-system market growth exceed 20% in 2025.
Without such a system, the risks are tangible. Drought restrictions routinely cut allowable landscape water by 40–60% during summer months, precisely when irrigation demand peaks. The result is a cycle of brown lawns, dead plantings, tenant complaints, and emergency water trucking at four times the tap rate. Agricultural operations face a steeper version: crop yields drop, livestock watering becomes rationed, and hydroponic systems shut down.
All data points in this guide are traceable to our internal engineering projects and to test reports from national qualification bodies such as the CABR Testing Center — so every design claim has a source.
The solution is to capture the rain that falls on your property and use it to irrigate your land.
What Are the Five Components of a Rainwater Harvesting System?
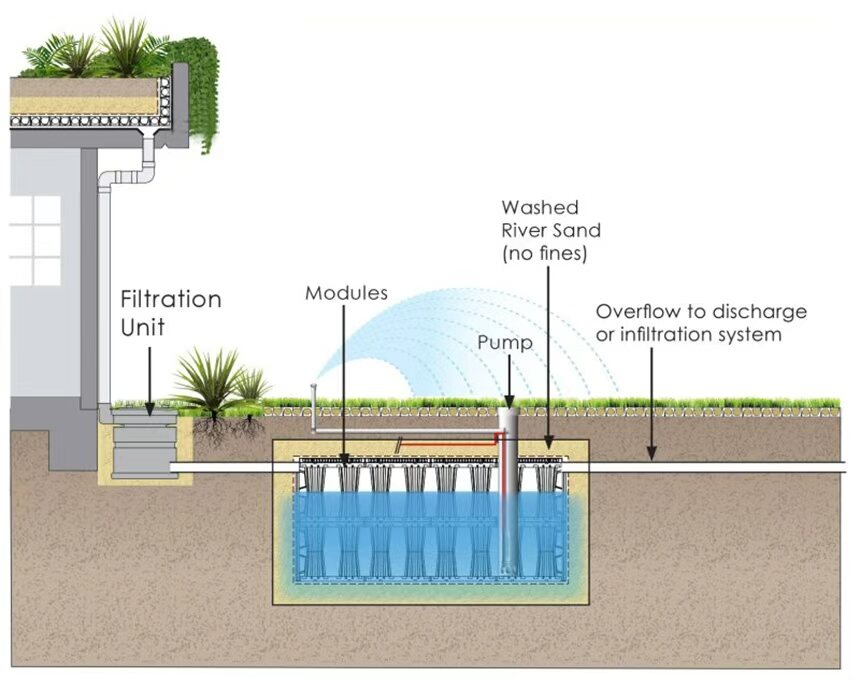
A rainwater-to-irrigation system is five components in sequence: collection surface → first-flush diverter → pre-filter → underground PP modular storage → pump and irrigation zone. Each one affects the performance of the next.
Which Collection Surface Should I Choose?
Rooftops — their runoff is cleaner, and collection efficiency reaches 85–90%. Metal, membrane, and concrete tile roofs all perform well. Ground-level surfaces — parking lots, driveways, paved courtyards — contribute more sediment, oil, and debris, so they require more aggressive pre-filtration. Green spaces and permeable surfaces generate minimal runoff and are generally excluded from the collection calculation. For irrigation projects, rooftop collection alone is usually sufficient. A 1,000 m² roof in a region with 800 mm annual rainfall yields approximately 680,000 liters (680 m³) of harvestable water per year — enough to irrigate 2,000–3,000 m² of landscaped area in most climates.
Do I Need a First-Flush Diverter?
Yes, because the first 2–5 mm of rainfall washes accumulated debris, bird droppings, pollen, and particulate matter off the collection surface. This initial volume is diverted away from the storage tank and discharged to the storm drain. A typical diverter — a standpipe with a float valve — fills with the first few millimeters, then seals itself off so subsequent rainfall flows into storage. For irrigation applications, diverting the first 2 mm is usually adequate; if water will also serve indoor non-potable uses, increase diversion to 5 mm.
What Pre-Filtration Is Required?
A 280-micron mesh filter is the standard specification. It removes leaf fragments, insect matter, and fine sediment that would otherwise accumulate in the storage tank and clog irrigation emitters. We install the pre-filter upstream of the tank inlet where it stays accessible, and use a self-cleaning vortex filter — so maintenance is only 2–3 times per year.
Why Store Water Underground in PP Modules?
Underground PP modular storage keeps your water cool, consumes zero surface space, and is engineered to last 50 years. The modules have a 92% void ratio — nearly all of their external volume is available for water storage. Storing water underground provides three advantages over above-ground tanks: temperature stability (blocking sunlight prevents algae growth), zero surface footprint (the system sits beneath a parking lot or landscaped area, leaving every square meter usable), and structural durability (modules rated to CJ/T 542-2020 heavy-duty standards can be installed beneath traffic-bearing surfaces).
You do not need to worry about underground pressure or structural loads — that part is already engineered and tested. Our modules carry a CJ/T 542-2020 heavy-duty rating and were tested over a nearly two-month period (December 2025 to January 2026) at the CABR Testing Center, a national-level qualification body, whose report confirmed every test item met or exceeded the standard. With a 50-year design life, you can confidently bury the system beneath a parking lot and, in effect, forget it is there. Load tables in the product data sheet are validated against ULS (Ultimate Limit State) criteria for both static earth loads and dynamic water loads, and municipal and structural engineers review the installation depth with us before we finalize it.
How Is Water Pumped to the Irrigation Zone?
A submersible pump in a pump sump (integrated into the module layout) feeds a pressurized distribution manifold. From there, water flows through underground piping to the irrigation heads — whether drip lines, micro-sprinklers, or rotary sprinklers. A simple float-switch control system activates the pump when the irrigation controller calls for water and shuts it off when the storage level drops below the pump intake. A municipal water backup connection ensures irrigation continues during extended dry periods when the tank runs dry.

How Do You Size, Build, and Install the System? Four Steps
Here is a four-step overview: calculate your irrigation demand, size the collection area and storage, select the module configuration, then install and commission the system.
Step 1: How Much Water Does Your Landscape Need?
Use the standard crop-coefficient method:
Daily irrigation demand (L) = Kc × A × ETo × 1000
Where:
Kc = Crop coefficient (0.3–0.5 for turf grass, 0.6–0.8 for shrubs, 0.8–1.2 for dense plantings)
A = Irrigated area (m²)
ETo = Reference evapotranspiration (mm/day) — available from local weather stations or the FAO Penman-Monteith database
For a 2,000 m² commercial landscape with mixed turf and shrubs in a subtropical climate (Kc = 0.6, ETo = 4.5 mm/day):
Daily demand = 0.6 × 2,000 × 4.5 × 1,000 = 5,400,000 mL = 5,400 L/day
No calculations needed — we handle the math. You don't need to run these formulas yourself. Tell our engineers your irrigated area and your city, and they will compute the precise water demand using professional software based on FAO standards, then design the system around it.Contact our engineering team for a free preliminary water-demand calculation.
Step 2: How Much Storage and Collection Area Do You Need?
Size storage for 10–30 consecutive dry days, then confirm your roof can refill it. For a subtropical climate, use 14 dry days: Storage required = 5,400 × 14 = 75,600 L ≈ 76 m³.
Then verify that the collection area can deliver this volume. A 1,200 m² rooftop with 800 mm annual rainfall and a 0.85 runoff coefficient yields:
Annual supply = 1,200 × 800 × 0.85 = 816,000 L = 816 m³/year
The annual irrigation demand is 5,400 × 365 = 1,971,000 L (1,971 m³), so the system covers roughly 41% of annual demand from rainwater. That is still a meaningful reduction in municipal water use — the remaining 59% comes from the municipal backup. For full self-sufficiency, you would need a larger collection area or a smaller irrigated area.
For a detailed walkthrough of the storage volume calculation, see our rainwater storage volume calculation guide.
Step 3: Which Module Configuration Do You Need?
Convert the required storage volume to module volume using the 92% void ratio: 76 ÷ 0.92 = 82.6m³ of module volume. Yingyuan standard 1000 series modules are suited to this scale of project. The modules are flat-packed, transported to site, and assembled in the excavated pit. The layout is flexible — modules can be arranged in long narrow trenches, wide shallow beds, or L-shaped configurations to fit around foundations and utilities.
Step 4: How Is the System Installed?
A typical 76 m³ system is installed and commissioned in 5–7 working days. The installation sequence follows standard practice for underground PP modular systems:
Excavate to design depth (typically 1.5–3.0 m below finished grade)
Place and compact a 150 mm crushed-stone base
Lay geotextile wrapping on the base and up the sidewalls
Assemble modules layer by layer, interlocking each course
Install inlet, overflow, and pump sump pipework
Fold geotextile over the top of the module matrix
Backfill in 300 mm lifts, compacting each layer
Reinstate surface (paving, topsoil, or hardscape)
Connect pump, controls, and irrigation distribution
Fill with initial water, test for leaks, and commission
What Results Can You Expect? A Real 2,000 m² Project
A 2,000 m² commercial landscape project we supported in 2025 was designed to be irrigated primarily by harvested rainwater. The system collects from a 1,500 m² warehouse rooftop, diverts the first 2 mm of rainfall, filters through a 280-micron vortex pre-filter, and stores water in a 95 m³ underground PP module array beneath the parking area. A submersible pump feeds a drip irrigation network across the landscaped zones.
During the wet season (April–October), the system supplies 100% of irrigation demand. During the dry season, municipal water supplements approximately 35% of total demand. The property's annual water bill for landscape irrigation dropped by 58% in the first year of operation.
Want to see more projects like this? Download our commercial rainwater-harvesting case-study collection to review payback data across climates and property types. Request the case studies from our engineering team.
Frequently Asked Questions
Is harvested rainwater safe for irrigating edible crops?
Yes. Rainwater from clean rooftop surfaces, with proper first-flush diversion and 280-micron pre-filtration, meets the water quality requirements for irrigating vegetables, fruits, and herbs in most jurisdictions. The underground storage environment — dark, cool, and sealed — prevents the bacterial growth and algae proliferation that can occur in open above-ground tanks. For projects where the harvested water contacts edible portions of crops directly (overhead irrigation), adding a UV disinfection stage between the pump and the irrigation lines provides an additional safety margin. Drip irrigation, which delivers water to the root zone without contacting leaves or fruit, does not require UV treatment in most regulatory frameworks.
What maintenance does the system require?
The system has three maintenance points: the pre-filter, the first-flush diverter, and the pump. The pre-filter needs cleaning 2–3 times per year (or after major storm events). The first-flush diverter should be inspected quarterly and the standpipe drained if it holds standing water. The pump requires annual inspection of the impeller and float switch. The underground modules themselves are essentially maintenance-free — there are no moving parts, no surfaces to clean, and the geotextile wrapping prevents soil and root intrusion. Agricultural reuse applications including irrigation, hydroponics, and livestock watering benefit from this low-maintenance profile because these operations rarely have dedicated facilities maintenance staff.
Does the system work with drip irrigation and sprinkler systems equally well?
Yes, but drip irrigation is the better match for harvested rainwater. Drip systems operate at low pressure (1–2 bar) and deliver water slowly, which means the pump can be smaller and the storage tank does not need to supply large instantaneous flow rates. Sprinkler systems demand higher pressure (3–5 bar) and higher flow rates, which requires a larger pump and may draw down the storage faster than the modules can drain into the pump sump. Both are technically feasible — the pump and pipe sizing simply need to account for the irrigation method.
What is the typical payback period for a rainwater irrigation system?
For commercial properties, the payback period ranges from 3 to 7 years depending on local water rates, rainfall patterns, and the scale of the installation. Properties in regions with high municipal water rates and reliable rainfall (Southeast Asia, coastal Australia, the southeastern United States) tend to see the shortest payback. In arid regions with low rainfall, the system offsets a smaller fraction of total demand, which extends the payback period — but the value of water reliability (avoiding drought-related landscape loss) often justifies the investment regardless of pure financial payback. The 50-year design life of the PP modules means the system generates savings for decades after the initial investment is recovered.
Next Steps
Rainwater harvesting for irrigation is one of the most direct ways to reduce operating costs and water dependency on a commercial or agricultural property. The system architecture is simple — collect, filter, store underground, pump to irrigation zones — but each component needs to be sized correctly for the site's rainfall, demand, and soil conditions.
For the detailed storage sizing methodology, start with our rainwater storage volume calculation guide. For water quality and filtration specifications, read our rainwater filtration system guide. And to review the module specifications that form the core of the storage system, see our standard 1000 series product page.
For project-specific design support, contact our engineering team with your irrigated area, location, and collection surface details. We provide preliminary system layouts and water balance calculations within 48 hours.
Related Reading
Irrigation demand changes the whole sizing calculation — the irrigation applications in our rainwater harvesting guide, PP modular tanks for irrigation systems, rainwater recovery system efficiency guide, commercial rainwater harvesting ROI analysis and Get a Quote.