




![[أخبار سارة] إدراج شركتنا بنجاح ضمن القائمة الأولى للمؤسسات التكنولوجية المعتمدة في مقاطعة جيانغسو لعام 2025!](https://oss.yy-aicloud.com/uploads/69c33be2eeba08e5e15c4e6d09c8333a17843461041a9.png?x-oss-process=image%2Fresize%2Cm_lfit%2Cw_500%2Fwatermark%2Ctext_aHR0cHM6Ly93d3cueXktdGFuay5jb20v%2Ct_01%2Ccolor_FFFFFF%2Csize_30%2Cfill_1)

Rainwater Harvesting Tank Size Guide — How to Choose the Right Capacity
13 Jul 2026Two Sizing Mistakes That Cost Projects Thousands
Get the tank size wrong on a rainwater harvesting project and the consequences follow you for years. We see two recurring errors across the projects our engineering team reviews.
The first is undersizing. A 200-unit residential development in Manchester specified 80 m³ of underground storage based on a rough rule-of-thumb calculation. The actual demand — toilet flushing, irrigation of communal grounds, and car park washdown — required 140 m³. During the first summer, the tanks ran dry by mid-June. The retrofit, which involved excavating finished landscaping, lifting newly poured access slabs, and splicing additional modules into the existing array, cost roughly three times what the original installation would have been. This single sizing error can jeopardise project viability across entire portfolios — the financial and operational impacts are felt at the portfolio manager's desk, not just the site office.
The second mistake is oversizing. A logistics centre in Rotterdam installed 300 m³ of storage for a roof that could only supply 180 m³ per year. The tank never filled past 60% capacity. The client paid for 120 m³ of unused excavation, extra geotextile and geomembrane wrapping, and additional modules that sat idle. Worse, the chronically low water level meant longer residence times and sediment accumulation in the lower modules. A tank that’s too large doesn't just waste capital; it also creates a stagnant, maintenance-intensive asset that underperforms its lifecycle cost projections.
Neither error is a design failure. Both are sizing failures — and both are avoidable with a structured approach. This guide walks through a five-step method that our team uses on projects ranging from single-building retrofits to multi-hectare commercial developments.
How to Size a Rainwater Harvesting Tank: A 5-Step Method
Step 1: Calculate Total Collection Area
Start by measuring every surface that drains into your system. This includes rooftop areas, paved courtyards, car parks, and any other impervious surfaces that channel rainfall toward your collection points.
Measure the horizontal footprint of each surface — not the angled or pitched area. For a pitched roof, use the plan view (the building's length multiplied by its width), not the slope-adjusted surface area.
Sum all contributing surfaces to get your total collection area in square metres. For irregular sites, break the catchment into rectangles and triangles, calculate each separately, and add them together.
The result is your gross collection area (A), measured in m².
Step 2: Determine Local Rainfall Data
Your tank size depends directly on how much rain falls at your site — and, more importantly, when it falls. You need two data points:
• Annual rainfall (mm/year), which determines total supply.
• Monthly rainfall distribution, which determines how supply aligns with demand across seasons.
• Design storm intensity (mm per event), which determines the maximum volume a single storm can deliver.
Use historical data from your national weather service — ideally 20+ years of records. Representative figures for common project locations:
Location | Annual Rainfall | Wettest Month | Driest Month |
London, UK | ~600 mm/yr | October (~70 mm) | February (~40 mm) |
Sydney, AU | ~1,200 mm/yr | March (~130 mm) | September (~70 mm) |
Dubai, AE | ~100 mm/yr | February (~35 mm) | June–October (~0 mm) |
These figures illustrate why location drives tank sizing more than any other variable. A 500 m² roof in Sydney collects roughly twice the annual volume of the same roof in London, and four times that of Dubai.
Step 3: Apply the Collection Efficiency Coefficient
Not every drop of rain that lands on your site reaches the tank. Wind blow-off, evaporation, surface absorption, and first-flush diversion all reduce the harvestable volume.
Apply a runoff coefficient (C), defined as the proportion of rainfall that becomes surface runoff. It is based on surface type :
Surface Type | Runoff Coefficient |
Rooftop (metal, tile, membrane) | 0.85–0.90 |
Paved surface (concrete, asphalt) | 0.70 |
Green roof (extensive) | 0.60 |
Gravel or permeable paving | 0.50 |
Key Unit Conversion Reminder:
Ensure consistency. Rainfall is often in mm. For volume calculations, convert to metres (m) by dividing by 1,000 (e.g., 600 mm/yr = 0.600 m/yr). Storage volumes are typically in litres (L) or cubic metres (m³); 1 m³ = 1,000 L.
The formula for annual harvestable volume:V_supply = A × P × C
Where A is collection area (m²), P is annual rainfall (m), and C is the runoff coefficient. A 1,000 m² metal roof in London yields approximately 1,000 × 0.600 × 0.85 = 510 m³ per year.
Step 4: Build the Demand Profile
List every application that will draw from the tank and estimate its monthly consumption . Typical non-potable demands include:
Application | Consumption Rate | Seasonality |
Toilet flushing | 5–8 L/person/day | Constant year-round |
Garden / landscape irrigation | 2–5 L/m²/day | Peak in summer, zero in winter |
Cooling tower makeup | 1–3 L/m²/day of cooled area | Peak in summer |
Car park / vehicle washdown | 50–150 L per wash | Constant or scheduled |
Industrial process water | Project-specific | Varies by operation |
The critical insight is that demand and supply rarely align. Irrigation demand peaks in summer — exactly when rainfall drops in most temperate and subtropical climates. Toilet flushing is constant, but winter rainfall may far exceed it. The tank's job is to bridge these timing mismatches.
Step 5: Select Tank Size Using the Supply-Demand Balance
For each month, calculate the difference between supply and demand. Track the cumulative balance across the year:
• In months where supply exceeds demand, the surplus fills the tank.
• In months where demand exceeds supply, the tank releases stored water.
The required tank capacity equals the maximum cumulative deficit across the longest consecutive dry period. You also need to check the maximum single-event capture volume to confirm the tank will not overflow during an intense storm.
Tank Size = max(Demand during longest dry period, Single-event capture volume)
The single-event capture is calculated as: A × C × P_event
where P_event is the design storm depth (typically the 90th-percentile daily rainfall for your location).
Key Formula Summary
• Annual Supply: V_supply = A (m²) × P (m) × C
• Tank Size: = max(Longest Dry Period Deficit, A × C × P_event (m))
• Unit Consistency is Critical: Always ensure A (m²), rainfall (m), and Volume (m³/L).
Sizing Checklist
·Collection area (A) accurately measured (plan view).
·Local rainfall data sourced (annual & monthly).
·Correct runoff coefficient (C) applied.
·Monthly demand profile quantified.
·Supply-demand water balance performed.
·Single-event storm volume checked.
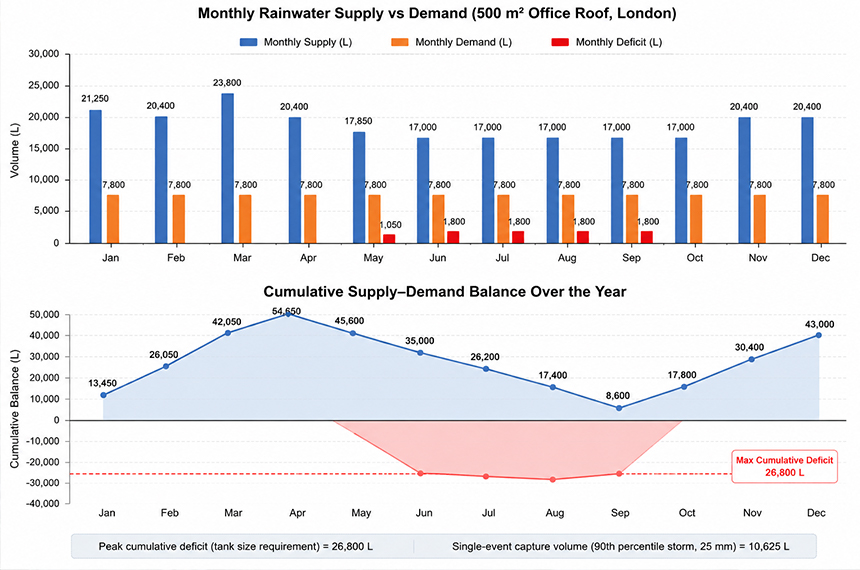
Worked Example: 500 m² Office Roof in London
A five-storey office building with a 500 m² flat membrane roof and 50 occupants. Rainwater serves toilet flushing only.
Supply: 500 m² × 0.600 m/yr × 0.85 = 255 m³/yr(255,000 L/yr)
Demand: 50 staff × 6 L/person/day × 312 working days = 93,600 L/yr. However, monthly demand is more granular. At roughly 6 L/person/working day, monthly demand averages around 7,800 L. Monthly supply ranges from approximately 17,000 L in October to 21,250 L in wetter months, dropping to about 17,000 L in drier summer months.
From May through September, the supply-demand balance tightens. Tracking cumulative deficit across these five months, the peak shortfall reaches approximately 26,800 L.
Single-event check: The 90th-percentile daily rainfall in London is roughly 25 mm. Capture from one storm: 500 × 0.85 × 0.025 = 10,625 L.
Tank size: max(26,800 L, 10,625 L) = 26,800 L, rounded to 27 m³. We would recommend 30 m³ as the practical specification, which provides a small safety margin and aligns cleanly with standard module configurations.
For a more detailed walkthrough of the volume calculation methodology, see our guide on how to calculate rainwater storage volume.
Converting Volume to PP Module Count
Once you have your target volume, the next step is translating that into a physical module array. Yingyuan manufactures three PP module lines, each suited to different project requirements:
Model | Dimensions | Unit Volume | Void Ratio | Storage Capacity |
1000 × 500 × 200 mm | 0.100 m³ | 92% | 92 L | |
1200 × 600 × 300 mm | 0.216 m³ | 92% | 198.7 L | |
1000 × 500 × 200 mm | 0.100 m³ | 92% | 92 L |
The void ratio — the percentage of internal space available for water storage — is a key differentiator for PP modular systems. At 95% void, Yingyuan modules store 95 to 205 litres of water per unit depending on the model, far exceeding the effective capacity of gravel soakaways or crate-style alternatives .
Configuration Examples
The following table compares module counts for two common system sizes. A key advantage of PP modules over traditional concrete tanks is their flexibility: they can be configured to fit irregular footprints, expanded in phases, and installed without heavy machinery, offering significant logistical and cost advantages on constrained sites.
Target System Volume | Module Model | Modules Required | Savings vs. Standard 1000 | Advantages vs. Concrete Tanks |
30 m³ (London office example) | Large 1200 | 147 modules | 53% fewer | Flexible layout, phased expansion, lower weight |
30 m³ (London office example) | Standard 1000 | 316 modules | / | |
100 m³ (residential development) | Large 1200 | 488 modules | 54% fewer | No need for crane, faster assembly, modularity |
100 m³ (residential development) | Standard 1000 | 1,053 modules | / |
The Large 1200 reduces module count and assembly time by roughly 55% compared to the Standard 1000 for the same volume — a meaningful saving on projects above 50 m³.
Assembly and Layout
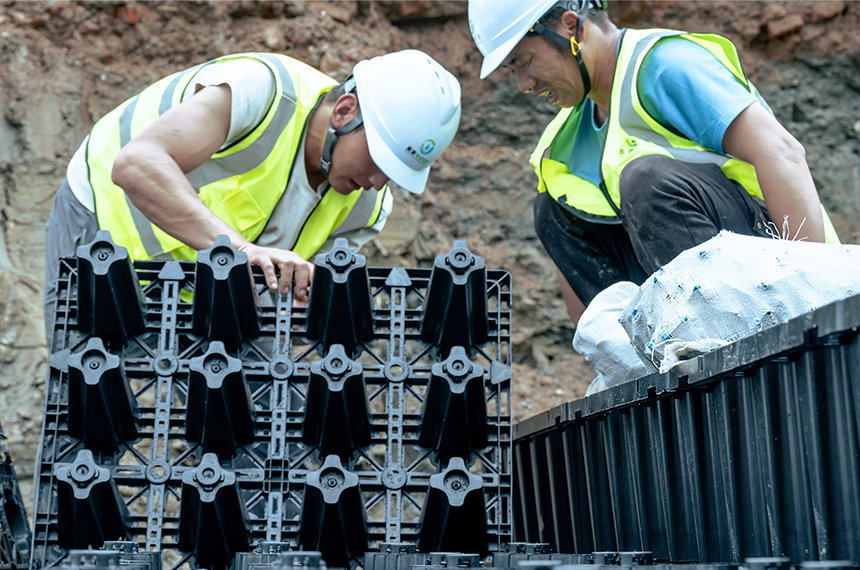
Modules connect on site through a groove-and-rib column interlock system that requires no cranes, welding, or specialist tools . Each module is hand-lifted into position — a Standard 1000 module weighs under 5 kg — and snaps into adjacent modules to form a continuous structural array .
You can configure the array in L, T, U, or rectangular layouts to fit beneath car parks, driveways, landscaped areas, or building footprints.Modules stack vertically for deeper installations, with a maximum cover depth of 3.5 m . The Hurricane HD variant is specified where vehicular loads are heavy — its 85-tonne load rating handles HGV traffic without additional structural slabs .
All Yingyuan systems are designed for a 50-year service lifeand manufactured in compliance with CJ/T 542-2020, the Chinese industry standard for modular rainwater storage . Independent testing has been carried out at the CABR Testing Center , with structural validation completed across a defined testing protocol.
If your project may require additional capacity in the future, the modular format supports phased expansion. An adjacent module block can be excavated and installed independently, then connected to the original array through standard pipe couplings — without disturbing the existing system.
Frequently Asked Questions
Q1: Should I size for average rainfall years or extreme years?
Design for the driest year in the past 10 years of local weather data to ensure reliable supply during drought conditions. Then verify that your overflow can handle the wettest single-month volume on record without backing up into the collection pipework. A monthly water balance based on 10+ years of data produces a far more reliable result than annual averages, which mask the seasonal timing mismatches that actually determine tank performance. In Chinese projects, such as those in the water-stressed North China Plain, designing for drought resilience is paramount, and local hydrological studies often provide recommended design rainfall return periods. For a full breakdown of system costs beyond the tank itself, our rainwater harvesting system cost guide covers excavation, installation, and lifetime operating expenses.
Q2: How do I handle future expansion?
The advantage of modular PP systems is straightforward: you add more modules. If your demand grows — a building extension, additional irrigation area, or a new end-use like vehicle washing — excavate an adjacent section, lay new modules, and connect them to the existing array through pipe couplings. The original installation stays in service throughout the expansion. This is fundamentally different from concrete tanks, where capacity is fixed at construction and expansion means building a second tank with separate plumbing and controls.
Q3: What is the minimum practical tank size for a rainwater harvesting system?
For commercial and institutional buildings, 10 m³ is a sensible floor. Below this, the system's contribution to overall water demand is marginal and the payback period stretches beyond what most project appraisals accept. For small residential projects — a single dwelling using harvested rainwater for garden irrigation — systems as small as 3–5 m³ can be practical, particularly in high-rainfall climates where even a modest collection area generates meaningful volumes. Engineering practice in regions like the UK and parts of China with mature rainwater harvesting markets often uses this 10 m³ threshold as a benchmark for cost-effectiveness in non-residential settings.
Q4: How does climate change affect tank sizing?
Rainfall patterns are shifting in most regions. Many areas see longer dry spells punctuated by more intense rainfall events. Both trends push toward larger storage. A tank sized on 20th-century rainfall averages may underperform within a decade. Our recommendation: add a 15–20% buffer above the calculated requirement. The marginal cost of additional modules is small relative to the total project cost (excavation, pipework, controls, and labour dominate), and the extra capacity provides insurance against drier-than-expected years. A larger tank also reduces the risk of ultimate limit state overload — structural failure caused by unexpected hydraulic surcharge during extreme storm events . Chinese engineering standards, such as those for sponge city construction, increasingly mandate climate resilience factors in storage design to account for these evolving patterns.
Quick Reference: Recommended Tank Capacities for Typical Scenarios
The following recommendations are based on industry experience and multi-region practice. They are intended for initial estimation only; final sizing should follow the full 5-step method. For projects in China, reference local standards like GB/T 50400 and regional "sponge city" technical guidelines for specific capacity requirements tied to annual runoff control targets.
Application Scenario | Recommended Tank Capacity | Notes |
Single dwelling (2–3 people, garden irrigation only) | 2–5 m³ | UK guidelines suggest ~1,000 L/person; upper end for high-rainfall areas |
Single dwelling (4 people, toilet flushing + irrigation) | 5–10 m³ | US Midwest recommendations for 4-person households range from 4,000–11,000 gal (15–42 m³) for whole-house supply; European norms suggest 4,000–6,000 L for partial use |
Small office / school (500 m² roof, 50 occupants, toilet flushing only) | ~30 m³ | Based on worked example in this guide |
Large residential development (200 units, flushing + irrigation + washdown) | ~140 m³ | Based on actual demand calculation, not rule of thumb |
Logistics centre / large roof with low water demand | Size by demand, not roof area | Prevents oversizing when water use is low |
Note: For household scenarios, if rainwater is used only for supplemental irrigation, the tank size can be at the lower end. If it also supplies constant year-round uses like toilet flushing, choose the higher end. Always consult local rainfall records and a qualified designer.
Editor: Zoey, Content Planning Department